I’ve lost count of how many times I thought I’d found a “deal” only to watch the price explode at checkout. Resort fees. “Mandatory” cleaning fees. Seat selection. Baggage. Suddenly that cheap trip isn’t cheap at all.
If you’ve ever felt blindsided by add-ons, this guide is for you. I’ll walk you through how to compare total trip cost across booking sites step by step, so you see the real price before you hand over your card.
Think of this as your personal checklist for not getting played by hidden travel fees and add-ons.
1. Stop Comparing First Prices – Compare Final Totals
The biggest trap is simple: we compare the first number
we see, not the final total.
Different sites play different games when it comes to travel booking platform fees and pricing tricks:
- Some show a low base fare, then add taxes, fees, baggage, and seat selection later.
- Others include more upfront, so they look more expensive at first glance.
- Hotels may hide resort fees, city taxes, or mandatory charges until the last step.
As Travelfineprint points out, what looks like a huge price gap early in the flow often shrinks once you reach the final checkout screen. The “cheapest” option can easily become the most expensive once everything is loaded in.
Here’s how I compare fairly and get a transparent travel pricing guide in practice:
- Open 2–3 tabs for the same flight or hotel (e.g., airline site, one OTA, one metasearch).
- Click through all the way to the last page before payment on each site.
- Write down or screenshot the final total for the same options (same room type, same fare class, same baggage).
- Only then decide which is actually cheaper.
It’s not glamorous. It’s also the only way to avoid being fooled by half-prices and online travel agency price tricks.

Key takeaway: Never judge a price until you’ve seen the final total with taxes, fees, baggage, and extras. The first number is marketing. The last number is reality.
2. Break Your Trip into Buckets Instead of Chasing One Big Number
Most people ask, How much will this trip cost?
I prefer a different question: Where will my money actually go?
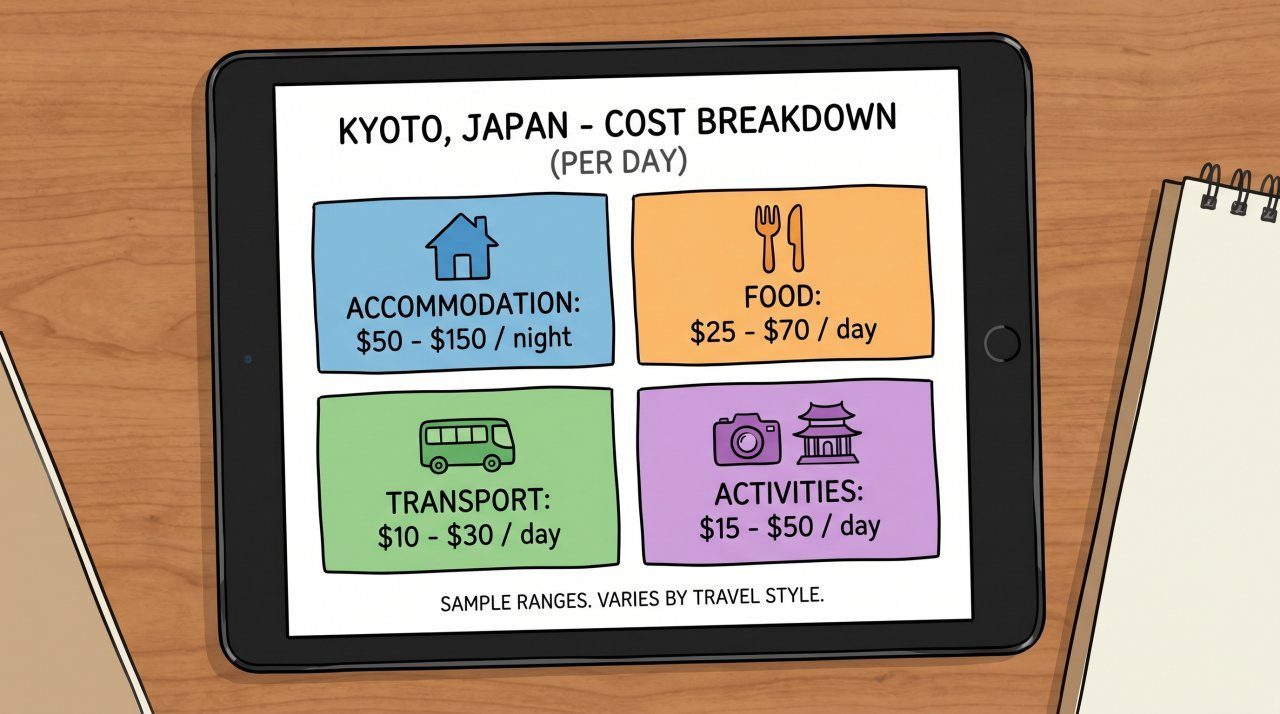
When you only look at a single total, it’s easy to miss where platforms are hiding costs. To compare total trip cost properly, I break every trip into four buckets:
- Accommodation – hotel, apartment, hostel, resort fees, and mandatory charges.
- Transport – flights, trains, buses, taxis, transfers, car rental.
- Food – eating out, groceries, hotel breakfast, snacks.
- Activities – tours, tickets, passes, experiences.
Tools like the GetOutTrip AI trip cost estimator do this automatically. You plug in your origin, destination, trip length, number of travelers, budget tier, and month, and it gives you a structured breakdown with low–high ranges for each category in your currency. It’s basically a real trip cost calculator instead of a guess.
Why this matters when comparing booking sites:
- If one hotel is cheaper but in a remote area, your transport bucket explodes (taxis, transfers, shuttles).
- If another hotel includes breakfast and a kitchen, your food bucket shrinks.
- If a package includes tours, your activities bucket might already be covered.
Instead of asking, Is this site cheaper?
I ask, Which combination of bookings gives me the best total across all four buckets?
Key takeaway: Don’t just compare totals. Compare how each booking choice shifts your accommodation, transport, food, and activity costs so you see the true total cost of flight and hotel plus everything around it.
3. Use Flight Comparison Tools Without Letting Them Confuse You
Flight comparison sites are powerful, but they can also overwhelm you with half-truths if you’re not careful.
Here’s how I use them without getting tricked by mistakes comparing travel prices:
- Start with metasearch, not a single OTA. Tools like Google Flights, Skyscanner, and KAYAK pull prices from airlines and online travel agencies (OTAs). They show you the landscape instead of one company’s version of it.
- Use flexible date tools. Google Flights’ calendar and Skyscanner’s full-month view make it obvious how shifting by a day or two can save a lot.
- Turn on price alerts. As SavingsGrove notes, booking 6–8 weeks out and using alerts is one of the most reliable ways to avoid overpaying.
- Watch for baggage and seat fees. Many comparison tools show base fares only. Click through to the airline or OTA and add baggage and seat selection to see the real total.
Platforms like Airfarewatchdog (highlighted by Upgraded Points) and Hopper add another layer: they monitor fares and tell you when to book or wait. I treat their advice as a signal, not a rule.

Key takeaway: Use comparison tools to find options and timing, but always click through to the final booking page and compare total prices including flight baggage and seat fee costs. That’s how to avoid hidden booking fees on flights.
4. Decode Hotel Prices: Same Room, Different Numbers
If you’ve ever seen three different prices for the same hotel room on three sites, you’re not crazy. The system is messy by design.
Here’s what’s usually going on, as explained by BestHotelsPrices:
- Different commissions. Some sites take higher commissions, some lower. That affects what they charge you.
- Wholesale room blocks. A site might have bought a block of rooms at a discount and is reselling them until they’re gone.
- Dynamic pricing. Hotels change prices constantly based on demand. Not all platforms update at the same speed.
- Taxes and fees. One site might show them upfront; another hides them until checkout.
- Different rules. Nonrefundable vs flexible, pay now vs pay at hotel, breakfast vs no breakfast.
So how do you compare fairly and get a clear cost breakdown across booking sites?
- Match the room type exactly. Same bed type, same view, same cancellation policy.
- Check what’s included. Breakfast, Wi‑Fi, resort fees, parking, and any mandatory charges.
- Look at the final payable amount. Including taxes, fees, and resort fees and mandatory charges that appear at checkout.
- Weigh the rules. A slightly higher price with free cancellation might be worth it.

Key takeaway: Don’t assume a lower nightly rate is cheaper. Compare final totals and cancellation terms for the exact same room and conditions, and always check the final price vs advertised price travel difference.
5. Factor in Group Size, Solo Premiums, and Seasonality
Two people booking the same trip on the same dates can still face very different per-person costs. The math changes with group size and season.
From the GetOutTrip estimator’s data, a few patterns show up:
- Accommodation scales badly for solos. A private room costs almost the same whether one or two people sleep in it. That means solo travelers pay a
solo premium
. - Groups win on private options. Split a 2–3 bedroom apartment or a private transfer among 3–4 people and your per-person cost can drop below shared or shuttle options.
- Luxury can narrow for groups. For four or more, the per-person gap between standard and luxury can shrink because private, higher-end options become more efficient when shared.
- Seasonality is brutal. Peak season can push accommodation 40–70% higher, sometimes double, compared to shoulder or low season.
Why this matters when doing a booking site price comparison:
- A “deal” for a solo traveler might be terrible value for a group, and vice versa.
- One site might surface more apartments or villas (great for groups), another more hotels (better for solos or couples).
- Travel month matters as much as platform. Shoulder season often beats any promo code.
I like to run a quick estimate with a tool like GetOutTrip, then sanity-check what I’m seeing on booking sites. If a platform’s prices are wildly below the estimator’s range in peak season, I immediately ask: What’s missing? Fees? Taxes? Terrible location?
Key takeaway: Don’t compare prices in a vacuum. Adjust your expectations for group size and season, and use estimators to spot offers that look suspiciously cheap or overpriced.
6. Use Metasearch and OTAs Together (Without Losing Control)
Not all travel sites do the same job. Some search; some sell. The lines are blurry, but understanding the difference helps you avoid headaches.
Here’s how I think about it:
- Metasearch engines (like KAYAK, Skyscanner, Google Flights) aggregate prices from airlines, hotels, and OTAs. They don’t usually ticket your flight or hold your hotel booking themselves.
- OTAs (like Expedia, Orbitz, Travelocity) actually sell you the ticket or room and handle your booking.
According to KAYAK and Upgraded Points:
- KAYAK aggregates prices from hundreds of sites and adds filters, price alerts, and a Trips feature to organize your bookings.
- Expedia, Orbitz, Travelocity, and others under the same group often show similar inventory but differ in loyalty programs, interface, and occasional promos.
My approach:
- Search on metasearch first. Get a sense of the price range and which providers are cheapest.
- Check direct vs OTA. If an OTA is cheaper, I compare final totals and rules. If the airline or hotel is close in price, I often book direct for easier changes.
- Use one “home base” for organization. KAYAK Trips or a similar tool can pull in confirmations from multiple providers so you don’t lose track.
Key takeaway: Use metasearch to see the market, OTAs for deals, and direct bookings for control. Always know who you’re actually booking with before you pay, and keep an eye on travel booking platform fees along the way.
7. Build a Simple Comparison Checklist (and Stick to It)
When you’re tired, it’s easy to click Book
just to be done. That’s when hidden fees win. I use a short checklist to keep myself honest and avoid common mistakes comparing travel prices.
Before I book anything, I ask:
- Have I seen the final total? Taxes, fees, baggage, seats, resort fees, cleaning fees, and any mandatory charges.
- Am I comparing the same thing? Same dates, same room type or fare class, same cancellation rules.
- What’s the baggage situation? Especially on flights. A “cheaper” fare with no bag can be more expensive once you add one.
- What’s the cancellation policy? Nonrefundable vs flexible, change fees, deadlines.
- Is there a better date or airport? One day earlier, a nearby airport, or shoulder season can save more than any promo code.
- Who will help me if something goes wrong? Airline vs OTA vs hotel direct. I don’t book with a provider I don’t trust to answer when things break.
It takes a few extra minutes. It also saves me from nasty surprises and regret bookings.
Final takeaway: The goal isn’t to find the lowest number on the screen. It’s to understand what you’re really paying for, compare total trip cost across booking sites, and choose the combination of bookings that gives you the best value for your trip, your group, and your risk tolerance.
If you start comparing final totals, break your trip into buckets, and use tools with a skeptical eye, you’ll stop getting tricked by add-ons—and start feeling in control of your travel budget again.